Do you want to backup and restore windows 10? Then there is no need to worry. Because this article shows you how to restore windows. Read our full article and take Windows 10’s backup of your PC.
Windows 10 backup and restore Follow our steps:
First Step: First find and open Control Panel. If there are many menu bars, click on the System and Security option.
Second Step: Then from the left pane, click on Create a system image link option. To save a backup file, click “Where do you want to save the backup?” Get information. To save the file, select the “On a hard disk” option, then set the file save location.
Third step: After completing the above two steps, you will need to click on the Start button, so the wizard will begin to create a full backup. The system will save the saved partition, which files you choose.
Windows 10 will continue copied during backup. This process is a technology that can be done even when running Windows. This means you can keep your computer running naturally because it’s an image copy of Windows 10.
After the backup is fully successful and if your PC is unable to recover it. For this, the backup will ask you to create the system repair Disk to access the option. If you allow the backup to be restored, always use the USB drive to save the installation files of Windows 10.
Step 4:
How to backup a system image of Windows 10 for restore?
If your PC does not boot due to various problems, do you want to start over with the previous installation? Or, have you replaced your computer’s hard disk? Therefore, follow the steps below.
An external drive must be attached to the computer to take a system image backup of your device. You then need to attach a device to your computer, which contains system repair files or bootable installation files of Windows 10.
If your PC does not boot the Windows Setup wizard, you must change the settings of the BIOS method. To change the BIOS setup, just press the f1 or Esc button when the PC starts to open. This will open a new page, from which you can change the BIOS settings.
5 Step: Click on the “Repair your computer” option on the lower left side of the computer skin like the image below.
Step six: Find three more menus, from which you have to click on the Troubleshoot option.
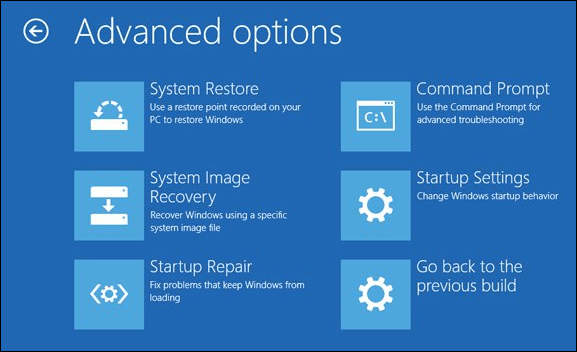
7 Step: Under Advanced Options, there are five more options, from which you have to click on “System Image Recovery”.
Chapter 8: Select the OS of your choice
Step 9: Select System Image Backup.
Step 10: After a full backup is restored to the new drive, select the Format and re-partition disks option. But, you have to do this very carefully, as it can erase computer partitions and disks.
Step 11: After a full backup is restored to the new drive, select the Format and re-partition disks option. But, you have to do this very carefully, as it can erase computer partitions and disks.
Step 12: Then click the Finish button.
Click the Yes button to move the data to the backup drive, then the recovery process will begin. The completion of the recovery depends on the hardware configuration and data size.
Remember that once Windows 10 backup and restore is complete, you will have an Internet connection on your PC. Go to the Settings menu in the Start menu, then click Update & Security and update Windows 10. The files and data that were lost will be restored.


একটি মন্তব্য পোস্ট করুন